Configure Core Isolation Virtualization-based Security | Windows 10
Key Points
- Defining Memory Integrity: Memory Integrity, or HVCI, is a Windows security feature that prevents malicious code from infiltrating system areas.
- Configuring Memory Integrity: Users can configure the feature in five ways:
- Windows Security: Open Windows Security, then navigate to Device Security > Device Security > Core isolation and click Core isolation details, then toggle Memory Integrity on or off.
- Registry Editor: Open Registry Editor, navigate to HKEY_LOCAL_MACHINE\SYSTEM\CurrentControlSet\Control\DeviceGuard\Scenarios\HypervisorEnforcedCodeIntegrity, locate the DWORD value “Enabled”, and modify it to 1 for enabled or to 0 for disabled.
- GPO: Open Group Policy Editor, navigate to Computer Configuration > Administrative Templates > System > Device Guard, double-click Turn on Virtualization Based Security, then select Disabled.
- Command Prompt: Open Command Prompt as an administrator, then run the appropriate command.
- PowerShell: Open PowerShell as an administrator, then run the appropriate command.
Windows Security’s primary function is to protect a system by providing antivirus software, a reliable firewall, and other security functionalities. Under Device Security, the built-in Windows Security suite includes Core Isolation. This key feature isolates system processes by leveraging virtualization-based security (VBS). In this blog, we will discuss how to manage this important feature and why it is necessary to turn Core Isolation VBS on or off.
What is Core Isolation Memory Integrity?
Memory Integrity, also known as Hypervisor-protected Code Integrity (HVCI), is a component of Core Isolation. It refers to a Windows security feature that helps prevent malicious code infiltration in high-security system areas. Memory Integrity uses hardware virtualization and Hyper-V to block untrusted code, strengthening Windows’ protection from malware.
Configure and monitor Windows security features at scale with NinjaOne.
→ Start a 14-day free trial or watch a demo.
Methods to turn off Memory Integrity
Memory integrity is enabled by default on Windows 11 22H2, though it may remain off if incompatible drivers are detected. However, should you need to disable the feature, you can use any of the methods in this section.
Method 1: Using Windows Security settings
- Press Win + I to open the Settings app, then navigate to Privacy and security > Windows Security.
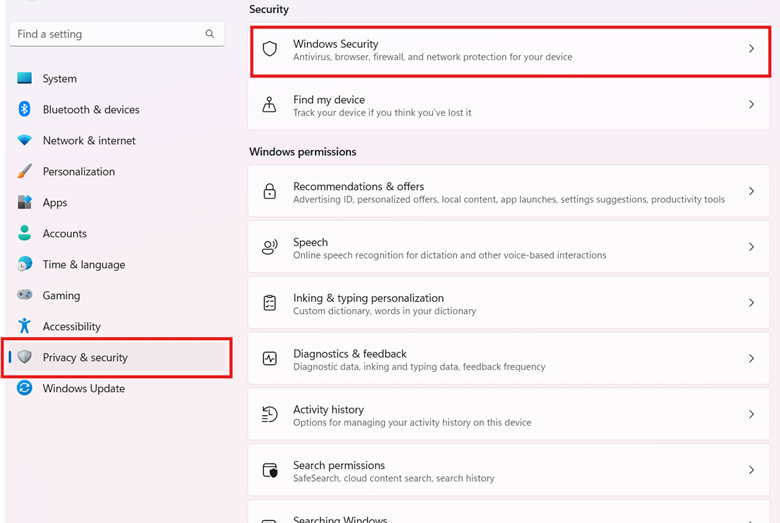
NOTE: Alternatively, you can go straight to Windows Security by searching for it in the Start menu bar, then clicking Windows Security.
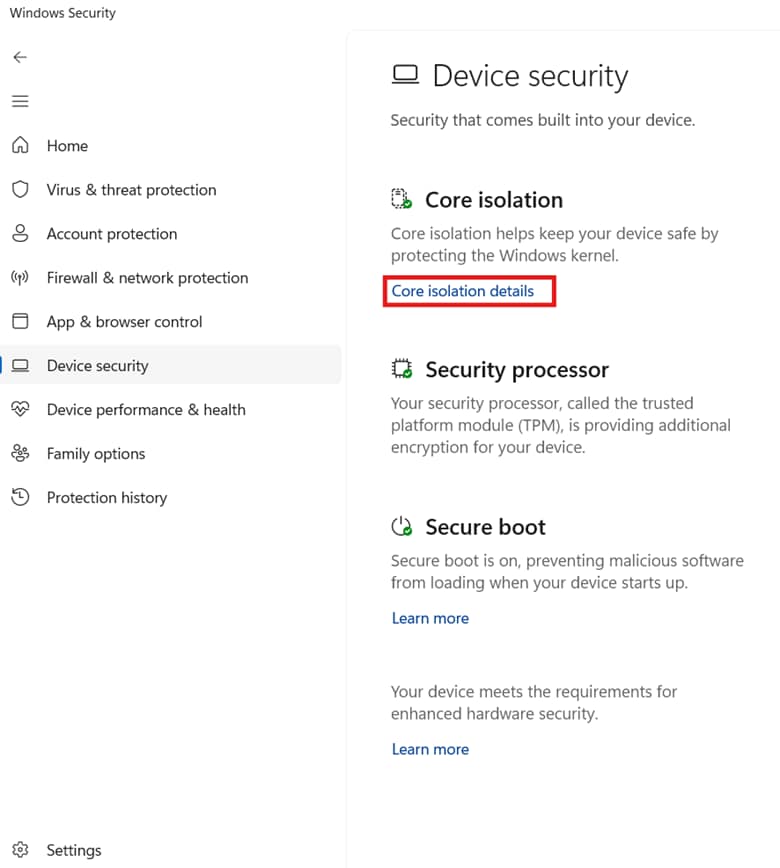
- Select Device Security, then click on Core isolation details under the Core isolation section.
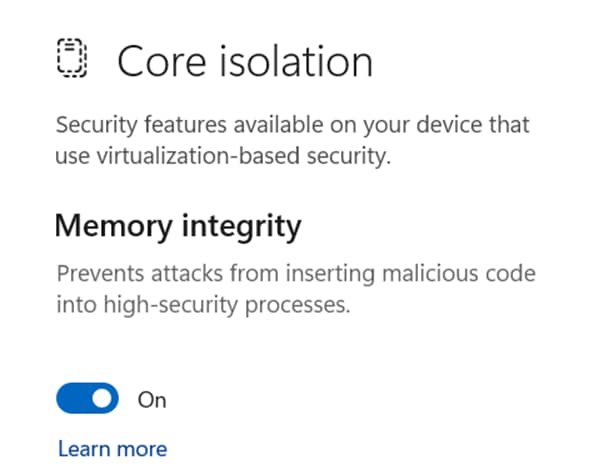
- Locate Memory Integrity and toggle it to Off.
- Click Yes if prompted by User Account Control (UAC) to confirm the change.
- Restart your computer for the changes to take effect.
Method 2: Using the Registry Editor (Regedit)
- Press Win + R, type regedit, then click OK to open Registry Editor.
- Navigate to the registry key HKEY_LOCAL_MACHINE\SYSTEM\CurrentControlSet\Control\DeviceGuard\Scenarios\HypervisorEnforcedCodeIntegrity
- Locate and double-click the DWORD value named “Enabled.”
- Modify the value to 0 to disable Memory Integrity.
- Close Registry Editor and reboot your device to apply changes.
Method 3: Using Group Policy Editor
- Press Win + R, type gpedit.msc, then click OK to open Group Policy Editor.
- Go to Computer Configuration > Administrative Templates > System > Device Guard.
- Double-click Turn on Virtualization Based Security, then select Disabled.
- Click Apply, then OK to save the settings.
- Run gpupdate /force in an elevated Command Prompt or restart your computer to apply the changes.
Method 4: Using Command Prompt
- Open Command Prompt as Administrator.
- Type the command below:
reg add “HKEY_LOCAL_MACHINE\SYSTEM\CurrentControlSet\Control\DeviceGuard\Scenarios\HypervisorEnforcedCodeIntegrity” /v Enabled /t REG_DWORD /d 0 /f
- Restart your PC to apply changes.
Method 5: Using PowerShell
- Open PowerShell as Administrator.
- Run the command below:
Set-ItemProperty -Path “HKLM:\SYSTEM\CurrentControlSet\Control\DeviceGuard\Scenarios\HypervisorEnforcedCodeIntegrity” -Name Enabled -Value 0
- Restart your PC to apply changes.
Why disable Core Isolation Memory Integrity
While Core Isolation Memory Integrity enhances Windows security, there are some instances where Core Isolation Memory Integrity is disabled.
- Incompatible drivers: Enabling the feature may render some device drivers and any older software dysfunctional.
- System performance issues: Slowdowns may occur in older hardware when Core Isolation Memory Integrity is turned on. The issue may be rooted in resource-heavy processes required for virtualization-based security.
- Troubleshooting: Turning off the Core Isolation Memory Integrity feature may improve the resolution of software or hardware issues.
Security risks of disabling Memory Integrity
Disabling Core Isolation Memory Integrity may expose your system to vulnerabilities, leading to security risks such as the following:
- Kernel-level attacks and rootkit installations: Kernel-level attacks exploit weaknesses in the Windows kernel. These attacks usually involve unauthorized rootkit installations designed to conceal their presence, challenging detection and removal.
- Unauthorized code execution: Since the feature focuses on preventing malicious code infiltrations, turning Core Isolation Memory Integrity off may let unverified code run in privileged areas of the system, making the system less resistant to malware attacks.
- Weakened system security: Disabling Core Isolation Memory Integrity may reduce the efficacy of Windows Defender and other security features.
How to check Core Isolation Memory Integrity status
In Windows 11 22H2 and later, Windows Security typically shows a warning if Memory Integrity is turned off. However, if you wish to verify the Core Isolation Memory Integrity feature’s status for yourself, you can do so in a straightforward process. Here’s how:
- Open Windows Security by searching for it in the Start menu.
- Click Device Security on the left panel.
- Select Core Isolation Details.
- Check if Memory Integrity is turned On or Off.
- If there are any warnings about incompatible drivers, resolve them before enabling Memory Integrity.
Troubleshooting issues when disabling Memory Integrity
If instructions are followed promptly, managing Core Isolation Memory Integrity is straightforward. However, some may encounter issues that impact the operation. Here are some of the most common issues and their solutions.
-
Memory Integrity toggle is grayed out
When the option to turn on or off Core Isolation Memory Integrity is grayed out in Windows Security, users may be unable to configure the feature’s settings.
Solution: If Core Isolation Memory Integrity is disabled in Security Settings, you can modify the feature’s settings through other methods, such as Registry Editor or Group Policy Editor.
-
Can’t disable due to system policies
Certain system policies may hinder users from changing the Core Isolation Memory Integrity settings.
Solution: Ensure you have Administrator privileges when changing Core Isolation Memory Integrity settings. You can log in to an Administrator profile or open an elevated PowerShell or Command Prompt. Additionally, you can Modify Group Policy settings to override restrictions. You can also use Registry Editor to disable Memory Integrity manually.
-
Memory Integrity re-enables after reboot
Restarting your computer is an essential step for the changes in the settings you made in Core Isolation Memory Integrity to take effect. However, there are times when Memory Integrity re-enables after reboot due to Windows Updates or endpoint security policies.
Solution: You can configure the Core Isolation Memory Integrity settings using Group Policy to disable Virtualization-Based Security. Meanwhile, some antivirus or endpoint security solutions may also have Memory Integrity settings that you can configure. Lastly, software or operating system updates may re-enable some security features, including Core Isolation Memory Integrity settings you previously turned off. For this, you can manually check the settings and disable them again.
Security considerations & best practices
As established, security risks are imminent when turning off Core Isolation Memory Integrity. Maintaining consistent protection is a conscious way to keep your system secured when a workflow calls for disabling Core Isolation Memory Integrity settings. Here are some best practices you can follow:
- Keep Windows Defender and Secure Boot turned on. Windows Defender protects your system from active threats such as malware attacks and others. While Secure Boot prevents malicious software from loading during startup.
- Utilize the Trusted Platform Module (TPM) to enhance security functionalities. The feature is a hardware-based tool that improves system encryption and authentication, helping secure Windows features such as Windows Hello and BitLocker.
- Ensure that Windows consistently receives important updates. You should not skip updates like bug fixes and patches since they help protect the system against vulnerabilities.
- In addition to Windows, your device drivers should also stay up-to-date so they won’t cause compatibility issues. Only update drivers through the Device Manager or the device manufacturer’s website.
Strengthen your device with hardware-backed security now. Watch How to Configure Core Isolation & Virtualization-Based Security in Windows.
Control your Windows systems to balance performance with security.
Explore NinjaOne Windows Endpoint Management.
Managing Core Isolation Memory Integrity
Maintaining security has always been the vital purpose of Core Isolation Memory Integrity. Given how crucial the benefits of this feature are, turning it off may have significant implications for a system’s security in general. It’s important to take precautions when managing Core Isolation Memory Integrity and understand the risks associated with disabling it.