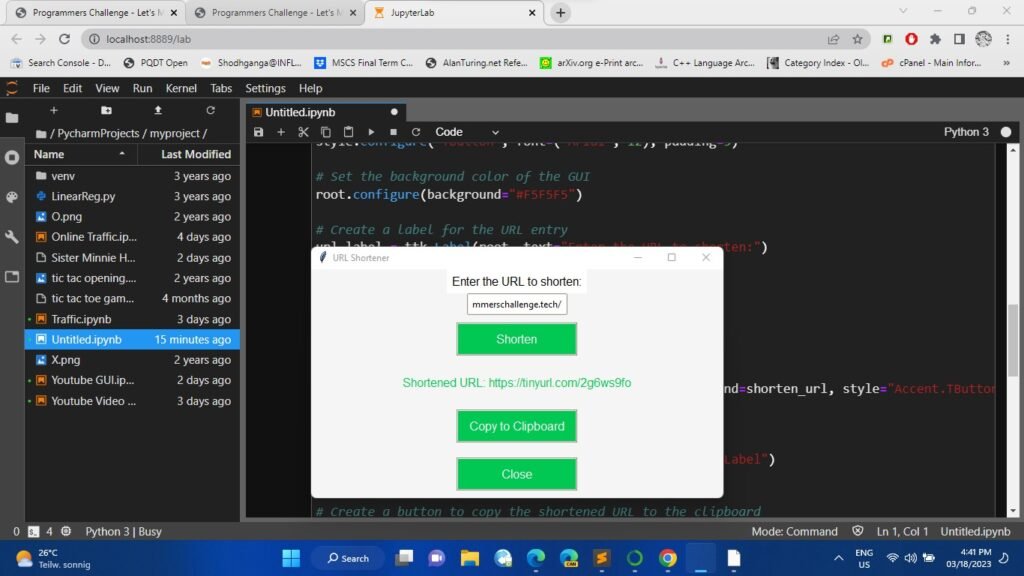
URL Shortener App in Python with Output
Introduction to URL Shortener App in Python:
URL shorteners are becoming more popular nowadays and Bit.ly is one of the most widely used URL shorteners. With the help of URL shorteners users can convert long and complicated URLs into shorter and easy-to-share ones. In this tutorial we will learn how to build our URL shortener like Bit.ly using Python.
Here’s a step-by-step guide on how to build a URL shortener app in Python:
Video Guide:
Step 1: Install Required Libraries
To build URL shortener app with GUI using Python you’ll need to install the pyshorteners and pyperclip libraries. You can install these libraries using the following command:
!pip install pyshorteners
!pip install pyperclip
Step 2: Import Required Libraries
After installing the required libraries, you can import them in your Python script as follows:
import pyshorteners
import tkinter as tk
import tkinter.ttk as ttk
import pyperclip
Here we’re importing the pyshorteners library for URL shortening, the tkinter library for creating the GUI, the tkinter.ttk module for creating themed widgets and pyperclip library for copying the shortened URL to the clipboard.

Step 3: Create a Function to Shorten the URL
Next we need to create function that will be called when user clicks on the “Shorten” button. This function should get the URL from the user shorten it using the pyshorteners library, and display the shortened URL to the user. Here’s the code for the function:
def shorten_url():
    url = url_entry.get()
    shortener = pyshorteners.Shortener()
    short_url = shortener.tinyurl.short(url)
    result_label.config(text="Shortened URL: " + short_url, foreground="#00C853")
    copy_button.config(state="normal", command=lambda: pyperclip.copy(short_url))
In this code we’re first getting the URL from url_entry widget, which is a ttk.Entry widget. We’re then creating a Shortener object using the pyshorteners library and using it to shorten the URL to a tinyurl. We’re then displaying the shortened URL to user using the result_label widget, which is a ttk.Label widget. Finally, we’re enabling the “Copy to Clipboard” button using the copy_button.config method, and setting its command to a lambda function that copies the shortened URL to the clipboard using the pyperclip.copy method.
Step 4: Create the GUI
Now, we can create GUI using the tkinter library. We first create a Tk object which represents the main window of the GUI:
root = tk.Tk()
root.title("URL Shortener")
Here, we’re setting title of the window to “URL Shortener”.
Next, we create a ttk.Label widget for URL entry:
url_label = ttk.Label(root, text="Enter the URL to shorten:")
url_label.pack()
This label simply displays text “Enter the URL to shorten:” to the user.
We then create a ttk.Entry widget for user to enter the URL:
url_entry = ttk.Entry(root)
url_entry.pack()
This widget allows user to enter the URL to be shortened.
Next, we create a ttk.Button widget for user to click to shorten the URL:
shorten_button = ttk.Button(root, text="Shorten", command=shorten_url, style="Accent.TButton")
shorten_button.pack(pady=10)
This button displays text “Shorten” to the user, and calls the shorten_url function when clicked.
We then create a ttk.Label widget to display result of the URL shortening process to the user:
result_label = ttk.Label(root, text="")
result_label.pack()
This label will be updated with shortened URL after the user clicks on the “Shorten” button.
Finally, we create a ttk.Button widget that the user can click to copy shortened URL to the clipboard:
copy_button = ttk.Button(root, text="Copy to Clipboard", state="disabled", style="Accent.TButton")
copy_button.pack(pady=10)
This button is initially disabled, but will be enabled after user clicks on the “Shorten” button. When clicked, it will copy the shortened URL to the clipboard using the pyperclip.copy method.
We also set style of the “Shorten” and “Copy to Clipboard” buttons to “Accent.TButton”, which is a custom style that we’ll define in the next step.
Step 5: Define Custom Styles
To make GUI look more attractive we’ll define some custom styles using the ttk.Style class. Here’s the code to define the styles:
style = ttk.Style()
style.configure("TLabel", background="#282C34", foreground="#FFFFFF")
style.configure("TEntry", background="#FFFFFF", foreground="#000000")
style.configure("Accent.TButton", background="#00C853", foreground="#FFFFFF")
In this code we’re setting background and foreground colors for the TLabel and TEntry widgets to dark gray and white, respectively. We’re also setting background color of the “Accent.TButton” style to green and the foreground color to white.
Step 6: Run the GUI
Finally, we run the GUI by calling the mainloop method of the Tk object:
root.mainloop()
This starts event loop that listens for user input and updates the GUI accordingly.
Complete Code
Here’s complete code for the URL shortener app with a GUI:
import pyshorteners
import tkinter as tk
import tkinter.ttk as ttk
import pyperclip

def shorten_url():
    url = url_entry.get()
    shortener = pyshorteners.Shortener()
    short_url = shortener.tinyurl.short(url)
    result_label.config(text="Shortened URL: " + short_url, foreground="#00C853")
    copy_button.config(state="normal", command=lambda: pyperclip.copy(short_url))

root = tk.Tk()
root.title("URL Shortener")

url_label = ttk.Label(root, text="Enter the URL to shorten:")
url_label.pack()

url_entry = ttk.Entry(root)
url_entry.pack()

shorten_button = ttk.Button(root, text="Shorten", command=shorten_url, style="Accent.TButton")
shorten_button.pack(pady=10)

result_label = ttk.Label(root, text="")
result_label.pack()

copy_button = ttk.Button(root, text="Copy to Clipboard", state="disabled", style="Accent.TButton")
copy_button.pack(pady=10)

style = ttk.Style()
style.configure("TLabel", background="#282C34", foreground="#FFFFFF")
style.configure("TEntry", background="#FFFFFF", foreground="#000000")
style.configure("Accent.TButton", background="#00C853", foreground="#FFFFFF")

root.mainloop()
I hope this helps you create your own URL shortener app with a GUI using Python!
Here are some useful links related to Python programming:
- Python documentation – the official documentation for Python 3.
- Python for Everybody – a free online course for beginners to learn Python programming.
- Python Software Foundation – the organization that supports and promotes the Python programming language.
- Python Challenge – a website with a series of challenges that test your Python programming skills.
- PyPI – the Python Package Index, which hosts thousands of packages that extend the functionality of Python.
- Jupyter Notebook – an open-source web application that allows you to create and share documents that contain live code, equations, visualizations, and narrative text.
- Python Tutor – a tool that visualizes the execution of Python code, which can be helpful for understanding how code works.
- Stack Overflow – a popular question and answer site for programming-related questions, including many related to Python.
- Python subreddit – a community of Python programmers who share news, articles, and discussions related to the language.